Are you tired of struggling to clean your coffee grinder? In this step-by-step guide, we will show you how to assess the ease of cleaning a coffee grinder. Our guide will help you understand the importance of a grinder that is easy to clean and provide practical tips on how to evaluate different models. With our help, you’ll be able to find a coffee grinder that not only produces great coffee but is also a breeze to clean!
Table of Contents
Discover the Top Coffee Grinder Picks


Step 1: Gather the necessary materials
To gather the necessary materials for cleaning your coffee grinder, collect the following items:
- Coffee grinder: Make sure you have your coffee grinder ready for cleaning.
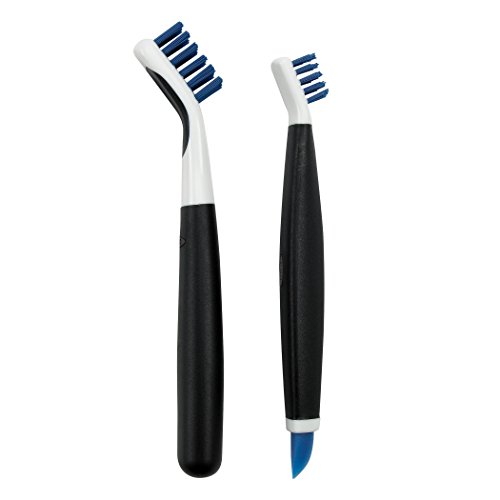
- Cleaning brush: Use a cleaning brush to remove any coffee residue or particles from the grinder.
- Dish soap: Prepare some dish soap to clean the parts of the coffee grinder.
- Warm water: Fill a bowl or sink with warm water to use for cleaning.
- Soft cloth or sponge: Grab a soft cloth or sponge to wipe and dry the coffee grinder surfaces.
Remember to have all these items handy before you start cleaning your coffee grinder.


Step 2: Unplug the coffee grinder
To ensure your safety during the cleaning process, make sure to unplug the coffee grinder from the power source. This will prevent any accidental starts or electric shocks. Remember, safety first!
Step 3: Disassemble the coffee grinder
To disassemble the coffee grinder, start by carefully removing the hopper, grind chamber, and any other removable parts as per the manufacturer’s instructions. Take your time and ensure that you handle each part with care to avoid any damage. Follow the step-by-step guidelines provided by the manufacturer to make the process easier and hassle-free.
Step 4: Remove excess coffee grounds
To remove excess coffee grounds, start by emptying any remaining grounds from the hopper and grind chamber. Simply tip the coffee grinder over a waste bin and shake it gently to release all the grounds. Make sure to clear out any loose grounds to ensure a clean and fresh brewing experience.


Step 5: Clean the removable parts
To clean the removable parts of your coffee grinder, start by using warm water and dish soap. Gently wash the parts, making sure to remove any coffee residue or oils. If necessary, use a soft cloth or sponge to scrub the parts. This will help keep your grinder clean and ready for the next use.
Step 6: Clean the grinder body
To clean the grinder body, start by wiping down the exterior with a damp cloth or sponge. If necessary, you can use mild dish soap to remove any stubborn dirt or stains. Make sure to pay attention to hard-to-reach areas and give them a thorough wipe to ensure a clean grinder.
Step 7: Dry all parts
After cleaning, make sure to thoroughly dry all parts of the coffee grinder. You can either use a clean towel to wipe them dry or let them air-dry completely before reassembling the grinder. This step is important to prevent any moisture from causing damage or rusting the parts. So, take your time and ensure everything is dry before putting it back together.
Step 8: Reassemble the coffee grinder
To reassemble your coffee grinder, start by carefully putting back all the cleaned and dried parts. Make sure they are properly aligned and securely attached. For example, insert the hopper onto the grinder body and twist it clockwise until it locks into place. Then, attach the handle to the grinder shaft by sliding it onto the peg and tightening the screw. Finally, reattach the collection bin by sliding it onto the bottom of the grinder and turning it clockwise until it clicks into position.
Step 9: Plug in and test the coffee grinder
To connect the coffee grinder to a power source, plug in the power cord to an electrical outlet. Once connected, press the power button or switch to turn on the grinder. Select a small amount of coffee beans and pour them into the grinder’s hopper. Adjust the grind size if needed, then press the grind button to begin the test grind. Observe the grind consistency and listen for any unusual sounds. If everything appears to be working correctly and you are satisfied with the grind, you can proceed to use the coffee grinder as desired.
Step 10: Regular maintenance
- Wipe the exterior: Grab a damp cloth and gently wipe down the exterior of your coffee grinder. This will remove any dust or grime that may have accumulated over time. Be sure to dry it thoroughly to prevent any water damage.
- Clean the removable parts: Take out the removable parts, such as the hopper and the grind chamber, and wash them with warm soapy water. Rinse them thoroughly and allow them to air dry before reassembling. This will remove any coffee residue and oils that can build up and affect the flavor of your coffee.
- Check for any clogs: Occasionally, check for any clogs in your coffee grinder. This can happen if coffee grounds get stuck in the burrs or other parts of the grinder. Use a small brush or toothbrush to gently clean out any clogs and ensure smooth operation.
- Inspect the cord: Examine the power cord for any signs of wear or damage. If you notice any fraying or exposed wires, it’s important to replace the cord to avoid any safety hazards. Contact a professional if you are unsure about how to properly replace the cord.
By following these simple maintenance steps, you can ensure that your coffee grinder stays clean and in optimal condition, providing you with delicious coffee for years to come. Remember, regular maintenance is key to keeping your coffee grinder performing at its best!
Wrapping it all up!
In conclusion, by following the steps outlined in this blog post, you can easily assess the ease of cleaning a coffee grinder. Taking the time to gather materials, disassemble, clean, and reassemble the grinder will ensure that you have a clean and well-maintained appliance. Regular maintenance and testing will help you enjoy delicious coffee every time. Happy grinding!
Gather Your Gear!


Quick Cleaning Hacks
Getting the perfect grind: Step-by-step instructions on how to use your coffee grinder
- Read the manual: Start by thoroughly reading the instruction manual that comes with your coffee grinder. It will provide valuable information on how to operate and test the machine correctly
- Check the grind settings: Familiarize yourself with the different grind settings on your coffee grinder. Test each setting to see how it affects the coarseness or fineness of the coffee grounds. This will help you find the perfect setting for your preferred brewing method
- Test consistency: Grind a small amount of coffee beans and examine the consistency of the grounds. They should be even in size and have a uniform texture. Uneven or clumpy grounds may indicate an issue with the grinder’s burrs or blades
- Observe noise and vibrations: While operating the coffee grinder, pay attention to any unusual noises or excessive vibrations. A well-functioning grinder should operate smoothly and quietly. Excessive noise or vibrations could indicate a problem that needs further investigation
- Clean and maintain: Regularly clean and maintain your coffee grinder as per the manufacturer’s instructions. This will ensure its optimal performance and longevity. Testing a coffee grinder also involves taking care of it properly
- Remember, testing a coffee grinder is an essential step to ensure a great coffee experience. Have fun experimenting and finding the perfect grind for your preferred brewing method!
Frequently Asked Questions: Testing Your Coffee Grinder
Does the coffee grinder produce excessive heat during grinding?
No, the coffee grinder does not produce excessive heat during grinding. Most coffee grinders are designed to minimize heat generation to ensure the flavor and aroma of your coffee beans are preserved. So you can enjoy a fresh and flavorful cup of coffee without worrying about excessive heat.
Is the coffee grinder prone to clogging or jamming?
No, the coffee grinder is not prone to clogging or jamming. Its design ensures smooth operation and consistent grinding. However, it’s always a good idea to clean the grinder regularly to prevent any build-up that might affect its performance. Happy brewing!
Does the coffee grinder produce any static electricity that causes grounds to stick?
Yes, coffee grinders can produce static electricity that causes grounds to stick. When coffee beans are ground, they create small particles that have a tendency to stick to surfaces due to static charge buildup. This can happen especially if the grinder or the container you’re using is made of materials that promote static electricity.
How easy is it to remove and clean the coffee grinder’s grinding burrs?
Removing and cleaning the grinding burrs of a coffee grinder can be fairly easy with the right tools and instructions. First, make sure to unplug the grinder for safety. Then, consult the user manual or manufacturer’s instructions specific to your coffee grinder model. Generally, you will need a screwdriver to remove the burrs, which are usually located inside the grinder’s hopper or grinding chamber. Once removed, you can clean the burrs using a small brush or soft cloth to remove coffee residue and oils. It’s important to be gentle to avoid damaging the burrs. Overall, with a little bit of care and attention, the process of removing and cleaning the grinding burrs can be relatively straightforward.
